Camosun offers two wireless networks for you to choose from. The camosun network is available at both campuses and gives you your quick internet fix. The eduroam network is available at both campuses and at other schools that are part of Eduroam worldwide.
Why are there two wireless networks?
The eduroam network is secure— data sent from your laptop or phone is encrypted. Depending on what operating system your device uses it might require more work to set up the connection, but after that you should connect to Eduroam automatically whenever you’re on campus.
The camosun network is quicker to connect to, but you have to log into it every time you’re on campus. It’s not secured, so data sent from your device to the wireless antenna could be snooped on by others. The camosun network is handy if you need to Google something quickly or pop on Facebook, but we highly recommend you use Eduroam. The camosun network is only open to students.
Connecting to the camosun network
To connect to the Camosun network you need a Camosun domain account and password.
- View the list of wireless networks on your device. Select the camosun network from the list
- Depending on your device, you may be automatically redirected to the Camosun wireless log in page
- If you’re not automatically redirected, open your web browser and try to go to any non-Camosun website (e.g., google.com)
- On the wireless log in page, enter your Camosun domain credentials.
Connecting to the eduroam network
To connect to the Camosun network you need a Camosun domain account and password. Your Eduroam username is your Camosun ID@camosun.ca. Example: C0123456@camosun.ca.
Option 1 • Use the Eduroam setup tool
Windows Vista, 7, 8, 8.1 and 10
Camosun uses the Eduroam configuration tool developed by Swansea University. This program will install the Eduroam network profile on your Windows computer and perform the initial configuration.
Important: While every effort has been made to test the Eduroam configuration tool, Camosun College will not be held liable if it causes damage to your computer. If you do not agree with this, please follow the steps under Option 2 • Configure Eduroam manually.
- Download the Eduroam configuration tool
- Unzip the downloaded file and run Camosun Eduroam Setup
- Enter your Eduroam username and password and click Start Setup
- Once setup is complete click the Exit button
Note If the Eduroam configuration tool gets stuck attempting to connect to Eduroam or obtain an IP address please be patient. After a few connection attempts the tool will finish and you can click the Exit button. If your computer doesn’t automatically connect to Eduroam, turn the wireless off and back on.
Option 2 • Configure Eduroam manually
General instructions for Windows
Specific steps may vary slightly depending on the version of Windows you use. Click any of the screenshots on this page to see a larger version.
- Open the Control Panel and locate the Network and Sharing Centre
- Select Set up a new connection or network then Manually connect to a wireless network
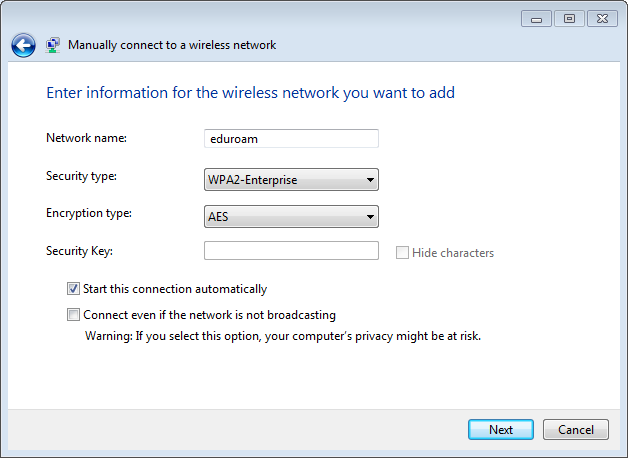
- Enter the following information then click Next:
- Network name: eduroam
- Security type: WPA2-Enterprise
- Encryption type: AES
- Checked: Start this connection automatically
- Select Change connection settings to open the eduroam Wireless Network Properties dialogue box
- Select the Security tab and verify the following:
- Security type: WPA2-Enterprise
- Encryption type: AES
- Network authentication method: Microsoft - Protected EAP (PEAP)
- Checked: Remember my credentials for this connection each time I’m logged on

- Select the Settings button and verify the following:
- Checked: Validate server certificate & GlobalSign Root CA (in the Trusted Root Certification Authorities list)
- Select Authentication Method: Secured password (EAP-MSCHAP v2)
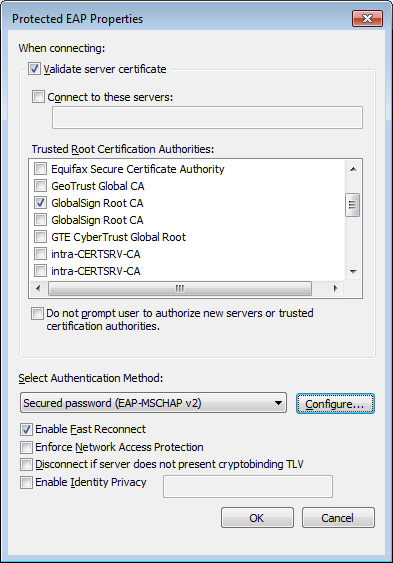
- Select the Configure… button:
- Unchecked: Automatically use my Windows logon name and password (and domain if any)
- Unchecked: Automatically use my Windows logon name and password (and domain if any)
- Click OK to close the EAP MSCHAPv2 Properties dialogue box
- Click OK to close the Protected EAP Properties dialogue box
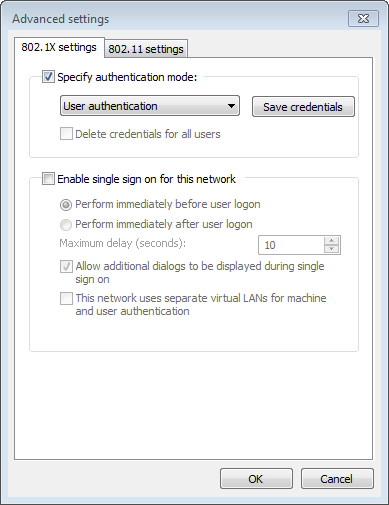
- Select Advanced settings in the eduroam Wireless Network Properties dialogue box
- Under the 802.1X settings tab:
- Checked: Specify authentication mode
- Authentication mode: User authentication
- Click OK to close the eduroam Wireless Network Properties dialogue box
- Click Close to finish the Manually connect to a wireless network process
- Select the wireless icon on the Windows taskbar, then select eduroam and connect
- Enter your Eduroam username and password in the Windows Security dialogue box and click OK